
Concepts
OpenShift builds a developer-centric workflow around Docker containers and Kubernetes runtime concepts. An Image Stream lets you easily tag, import, and publish Docker images from the integrated registry. A Build Config allows you to launch Docker builds, build directly from source code, or trigger Jenkins Pipeline jobs whenever an image stream tag is updated. A Deployment Config allows you to redeploy whenever a new image becomes available. Routes make it trivial to expose your Kubernetes services via a public DNS name. As an administrator, you can enable your developers to request new Projects which come with predefined roles, quotas, and security controls to fairly divide access.
Deploying OpenShift Origin
The playbooks in the repository also have the ability to configure CentOS or RHEL instances to prepare for the installation of Origin. Due to the OpenShift playbooks not being available in RPM format outside of an OpenShift Container Platform subscription the openshift-ansible repository must be cloned. At this time, the following cannot be performed within a container due to known issues that have been found while running openshift-ansible in a container. It is advised to use a virtual or bare metal machine.
Step 1 – Vmware and Openshift 1.5
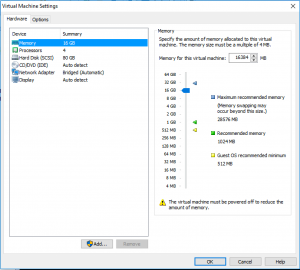
Setup Vmware Workstation VM:
After that, install centos 7.3 Minimal: http://isoredirect.centos.org/centos/7/isos/x86_64/CentOS-7-x86_64-Minimal-1611.iso
Install the following software packages:
yum install -y epel-release
yum install -y docker wget git gcc net-tools
yum install -y python-cryptography pyOpenSSL.x86_64  java-1.8.0-openjdk-headless
yum install -y python-pip python-devel python python-passlib
pip install ansible
Clone the Openshift ansible playbooks from Github:
git clone https://github.com/openshift/openshift-ansible
Generate your own ssh key to allow to run ansible playbooks locally on your VM.
ssh-keygen -t rsa
Then edit your /etc/hosts (VM) and put your own domain name (this domain name would be the same you must register in AWS Route53)
vi /etc/hosts
127.0.0.1      <Your Domain>
This previous step is very important and mandatory because when we run ansible playbooks it would register this values inside Openshift cluster.
Copy your ssh key:
ssh-copy-id root@<Your Domain Name>
Inventory file:
vi inventory
[OSEv3:children]
masters
nodes

[OSEv3:vars]
ansible_ssh_user=root
openshift_release=v1.5
deployment_type=origin
openshift_master_identity_providers=[{'name': 'htpasswd_auth', 'login': 'true', 'challenge': 'true', 'kind': 'HTPasswdPasswordIdentityProvider', 'filename': '/etc/origin/master/htpasswd'}]
containerized=true
enable_docker_excluder=false
enable_openshift_excluder=false
openshift_release=1.5
openshift_image_tag=v1.5.0
openshift_install_examples=true
openshift_public_hostname=<Your domain>
openshift_master_default_subdomain=apps.<Your domain>
openshift_hosted_metrics_deploy=true
[masters]
<Your Domain> openshift_schedulable=true

[nodes]
<Your Domain> openshift_node_labels="{'region': 'infra', 'zone': 'default'}" openshift_schedulable=true
Start Openshift installation:
ansible-playbook -i inventory ./openshift-ansible/playbooks/byo/config.yml
Create your Openshift user:
yum install -y httpd-tools
htpasswd /etc/origin/master/htpasswd <Your User>
Step 2: Route53
Amazon Route 53 is a highly available and scalable cloud Domain Name Services (DNS) web service. It is designed to give developers and businesses an extremely reliable and cost effective way to route end users to Internet applications by translating names like www.example.com into the numeric IP addresses like 192.0.2.1 that computers use to connect to each other. Amazon Route 53 is fully compliant with IPv6 as well.
I am not going to explain how to buy, register and create a domain name, please follow AWS Router53 documentation.
http://docs.aws.amazon.com/Route53/latest/DeveloperGuide/Welcome.html
Create a record set on Route53:
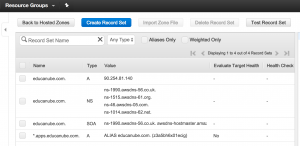
As you can see in the image my domain educanube.com point to temporary IP, this temporary IP is my public IP from home.
Create an ALIAS record like the image:
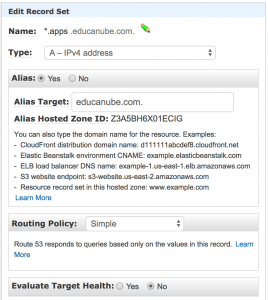
*.apps.<Your Domain> to point to your domain.
This will allow publishing our applications to the internet.
Step 3: At Home
We need to expose Openshift to the world and the easy ways to do it is exposing the VM as a Static NAT/DMZ/Exposed Host
Example from Vodafone router:
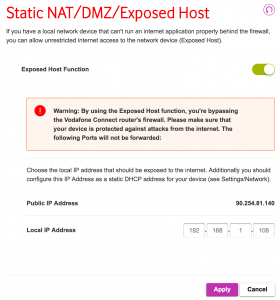
Remind you, your local IP address would be your VM IP address. As a recommendation install fail2ban if you want your Openshift lab run 24/7.
Step 4: Test the lab
From Home:
Edit your PC hosts files (Windows, Mac, Linux) to point to your VM IP Like this:
192.168.1.108 www.yourdomain.com
And then access to your Openshift Origin Console:
https://yourdomain:8443

From the internet:
https://yourdomain:8443
Step 5: The tricky – Publishing applications
To test your applications at home, your always have to modify the host files.
At Home:
Edit your PC hosts files (Windows, Mac, Linux) to point to your VM IP Like this:
192.168.1.108 www.yourdomain.com
192.168.1.108 jenkins-easynube.apps.yourdomain
From the internet:
There is not any problem, all your applications would be published.